I had this idea once to exchange postcards with people if they emailed me their addresses, but only four people ever responded, and I chickened out on sending postcards to most of them because I couldn't make nice enough postcards. Also, everybody in Ku House lost their jobs right about then, so... you know, distractions.
I just found this today. :D
I think I'll be able to do it this time, without the pressure of knowing who I'm sending to... also, there are a ton more decent postcards available in Arizona than I ever found in Missouri.
Thursday, October 14, 2010
Friday, September 24, 2010
Experiment: Pastel Crayons + Oven
Having moved into the new Ku House (and getting all my boxes of crap garbage stuff back from storage), I've been coming across tons and tons of old "kiddy grade"* art supplies that I've never used. They include cheapo oil pastels, which aren't really oil pastels like those you might find in a box at an art store labeled as such, but rather the waxy, hard stumps that come with colored pencils and questionable watercolors in a wooden box that gets billing as a hundred-piece kit for little artists. I received these lovely presents from family at Christmas... and again on my birthday... some 10 years ago, when I did more illustration than making-of-stuff. The sentiment was (and still is) much appreciated, but I now have a collection of some 70+ chunks of highly-pigmented oily wax without a cause. Furthermore, none of the charities around here will accept art supplies. ;_;
Hmm. Waxy stuff melts, doesn't it?
Here's what happens when you put pastel crayons in the oven.
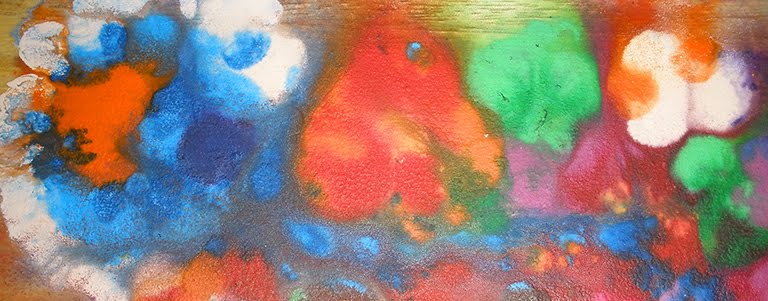
First up, I tired drawing on a piece of scrap board, conveniently broken into size by my sister via Taekwondo practice. The pastels didn't take kindly to the surface at first, so I softened them up a bit by holding them over a lit candle for a few seconds at a time. They got all smeary. I put the colorful, smeary piece of wood in the oven at 225 for about 20 minutes.
Well, okay. I was hoping the colors would mesh together more than they did and smooth out a little. I also wasn't expecting the oily halo on the wood, but that's kinda cool. The oven did take care of the loose crumbles of pastel that clung to the board... you know, the kind that you have to pick off really carefully, otherwise you brush them accidentally and they leave little streaks of stray color all over your picture. Additionally, neither this nor any of the rest of the following procedures produced any bad smell; there was only a light scent of wax when dealing directly with the hot piece as it was removed from the oven.
Next up, melting the pastels and dripping directly on the board. If rubbing warm pastels on the surface of wood made them stick half-heartedly, surely dripping hot melted pastel from a few inches above would give greater adhesion. Less control, of course, but that wasn't really my interest any more -- I just wanted to make pretty colors. After dripping (and it wasn't quite as drippy as I expected), I put the board into the oven again, this time at 275 for 15 minutes.
The colored patches meshed together a little better, and even traveled across the board... while in other places they didn't blend at all, just met and evened out. Also, I had a lot of little bubbles pop up from the wax. They left a sort of mottled surface texture.
Once more at 320 for 30 minutes:
...and that's enough of that.
Lastly, I wanted to try making a wacky crayon. You can recycle broken wax crayons into a shiny new chunk-o-crayon that looks exciting to little kids (and anyone easily distracted by bright colors, like me). It seemed like waxy pastel crayons might benefit form the same treatment. I got a piece of tough old tupperware, broke bits off the pastels, and jumbled them up in the tupperware mold. A metal mold (like a muffin tin) would be the safer choice, but I didn't have one of an acceptable size. The piece-filled mold was placed on a scrappy baking sheet for the sake of stability and catching any melt that might bubble over. This ended up not being an issue at all, as the pastels melted and sank to the bottom of the mold without any spitting and very minimal bubbling.
Bake for 30 minutes at 300, and voila:
...not at all worth eating, but visually intriguing, nonetheless.
EDIT: And, at Keira's insistence, here is how it draws:
The pastels did in fact melt just like normal crayons do, and the tupperware was not affected except for some colorful residue that I scrubbed out later. I should mention that there was a layer of translucent, cloudy oil/wax that formed on the surface of the block as it was forming in the oven. When cooled, this layer was the same consistency as that of the colorful block below it, but rubbing it on paper produced no color. I shaved the layer off with a craft knife before taking the image you see above.
In conclusion, one can indeed put cheap pastel crayons in the oven to produce various effects without fear of immolation, explosions, bizarre and persistent smells, or ruining the oven with little waxy splatters. The actual quality of the effects achieved remains debatable... but experimentation is always preferable to throwing away unused art supplies.
...and I still have a lot of pastel crayons to use up. -_-;
*In truth, there is no such thing as kiddy grade or student grade materials; you can make real, sincere art out of anything -- the only limit is the artist's vision. :D
Hmm. Waxy stuff melts, doesn't it?
Here's what happens when you put pastel crayons in the oven.
First up, I tired drawing on a piece of scrap board, conveniently broken into size by my sister via Taekwondo practice. The pastels didn't take kindly to the surface at first, so I softened them up a bit by holding them over a lit candle for a few seconds at a time. They got all smeary. I put the colorful, smeary piece of wood in the oven at 225 for about 20 minutes.
![]() | |
|
Next up, melting the pastels and dripping directly on the board. If rubbing warm pastels on the surface of wood made them stick half-heartedly, surely dripping hot melted pastel from a few inches above would give greater adhesion. Less control, of course, but that wasn't really my interest any more -- I just wanted to make pretty colors. After dripping (and it wasn't quite as drippy as I expected), I put the board into the oven again, this time at 275 for 15 minutes.
Flammability was not an issue. :D
The colored patches meshed together a little better, and even traveled across the board... while in other places they didn't blend at all, just met and evened out. Also, I had a lot of little bubbles pop up from the wax. They left a sort of mottled surface texture.
Once more at 320 for 30 minutes:
...and that's enough of that.
Lastly, I wanted to try making a wacky crayon. You can recycle broken wax crayons into a shiny new chunk-o-crayon that looks exciting to little kids (and anyone easily distracted by bright colors, like me). It seemed like waxy pastel crayons might benefit form the same treatment. I got a piece of tough old tupperware, broke bits off the pastels, and jumbled them up in the tupperware mold. A metal mold (like a muffin tin) would be the safer choice, but I didn't have one of an acceptable size. The piece-filled mold was placed on a scrappy baking sheet for the sake of stability and catching any melt that might bubble over. This ended up not being an issue at all, as the pastels melted and sank to the bottom of the mold without any spitting and very minimal bubbling.
Bake for 30 minutes at 300, and voila:
...not at all worth eating, but visually intriguing, nonetheless.
EDIT: And, at Keira's insistence, here is how it draws:
In conclusion, one can indeed put cheap pastel crayons in the oven to produce various effects without fear of immolation, explosions, bizarre and persistent smells, or ruining the oven with little waxy splatters. The actual quality of the effects achieved remains debatable... but experimentation is always preferable to throwing away unused art supplies.
...and I still have a lot of pastel crayons to use up. -_-;
*In truth, there is no such thing as kiddy grade or student grade materials; you can make real, sincere art out of anything -- the only limit is the artist's vision. :D
Labels:
crayons,
experiments,
pastels
Tuesday, August 24, 2010
More excuses... sort of.
So we've been in the process of moving Ku House (which has been an apartment sine last August) to an actual house, which is fantastically painted in bright reds and oranges and yellows on the inside and has the most awesome view from the backyard, ever.
During this process, there's a gap of many days since canceling internet service at the apartment and getting it set up at the house, which will hopefully occur this coming Friday if Comcast does not consist entirely of mean jerks. :<
In the meantime, water is falling from the sky and eating the mountains in big grey waves of The Nothing, like from Neverending Story. :D
Here is a picture:
Those are the Catalina Mountains, as viewed from their western side, looking east. They continue much farther to the north (left) than you can see them here, mainly because the sky is om-nom-nomming them with it's pointy rain teeth.
Monsoon season is awesome.
Labels:
Arizona,
trouble at Ku House
Saturday, July 24, 2010
A List
A bilingual list of (some of) the stuff I need to make into softies:
郵便車 (yuubinsha, a post truck)
郵便箱 (yuubinbako, a post box)
ラジオ (rajio, a radio; which can also be 無線, musen)
せみ (semi, a cicada)
サボテン (saboten, a cactus)
ヒトデ (hitode, a sea star)
ベタ (beta, a fighting fish)
ホットドッグ (hotto-doggu, a hot dog, for some silly reason)
小さな蟹 (chiisana kani, a tiny crab)
太っている鯣 (futotteiru surume, a fat cuttlefish)
鮫 (same, a shark, because SereneSky asked for one)
Any suggestions to add to the list? :3
"You're on my list, Birdman!"
Monday, July 12, 2010
ゆびぬき:yubinuki, Japanese thimbles
Once again, I have been side-tracked into another J-craft. I officially cannot resist pretty things. Not even a little bit.
These are seriously awesome, though.
The word yubinuki simply means "thimble" in Japanese. It can refer to the bucket thimbles we're accustomed to in the west, leather cuff thimbles, metal pad thimbles, or any one of several "thing that goes on your finger when you are sewing" accessories.
What we've specifically got here are kaga yubinuki (加賀指ぬき). They are padded fabric rings decorated with silk thread. The origin of this style of thimble is credited to the Kaga region of old Japan, modern day Ishikawa prefecture, hence the term kaga yubinuki. When the term "yubinuki" is used in English, it is almost always in reference to this unique type of embroidered thimble.
I discovered yubinuki by way of a related craft called temari (てまり), a topic upon which I really, really hope to do a tutorial soon. The two are related in that they both apply colorful geometric patterns of silk thread to a padded, curved surface. Yubinuki, however, are easier in my humble opinion: there are fewer divisions to keep track of, only one stitch to remember, and they are generally much smaller.
The materials to make a yubinuki are fantastically simple. You need only a small piece of fabric, a needle, some thread in a few colors, some strips of paper, and a little padding. The Japanese use loose-fiber silk padding, but for those stitching in the west, I find that a bit of an unrolled cotton ball works just as well. (Polyfil does NOT work very well, as it is very springy and hard to wrap around the ring base without bits of it sticking out everywhere.)
もし日本語が読めれば、こちらには簡単な how-to があります。:D
If you can read Japanese, here is a simple tutorial all on one page. A more complete tutorial and the pattern to make the double yabane (arrow-tail) pattern can be found here. Even if you don't read Japanese, it's worth a look at just the pictures in each tutorial -- you'll quickly get the feel for what is being done.
Yubinuki instructions in English are a little harder to come by. Fortunately, there is Chloe Patricia and her blog, Ma Mercerie. Madam Patricia gives excellent tutorials for building a thimble base, stitching, making and using patterns, and more, all in English. パツリシア様、大変お世話になりました!
Once you're comfortable with building a ring base, all you need to do is learn the knot to start a new thread on the ring:
...and the single stitch used to make all the various patterns:
What allows for the variety of patterns is the number of divisions you mark on the ring (how many zig-zags of each thread), and in what order the different colors of threads reach across each other. After you get used to the basic stitch, you'll likely be able to mentally de-construct a finished yubinuki and understand the pattern used to make it. I'll be posting the basic ones as I finish graphing them out. :D
Until then:
Tutorials
Base-making tutorial: excellent pictures, Japanese text - also shows how to divide strips without measuring, using a line set or graph (from てんとう虫がやって来た)
Base and stitch tutorial: in Japanese (from Fujix Ltd. publishing)
Base and double yabane pattern tutorial: in Japanese, click each link in order from top to bottom to get a breakdown of materials, base making, divisions, stitch method, and pattern (from Thimble Japan)
Galleries
From 茶飲み話: works from 2006, 2007, 2008, and 2009 (all separate links)
From Zuccaさん: handmade yubinuki gallery
From Quilt-Yui: handmade yubinuki divided by design type (click the various links beneath the words 店主のギャラリー, the fourth menu item down in the left-hand frame)
From 人鳥官: yubinuki and quilting, link goes directly to yubinuki section
Blogs
Small pieces (category 加賀指ぬき)
Amerika tsukuri (full of yubinuki, temari, and miniatures of both)
...and there are a ton more. Try copy-pasting the Japanese term 加賀ゆびぬき (kaga yubinuki) into a GIS. Or, you know, just click here. :D
All actual pictures of kaga yubinuki in this post have been blatantly stolen from the Internet; I wanted to credit them, but I lost the links to the sites from which I saved them, 'cause I'm an idiot. -_-; すばらしい加賀指ぬきの写真は無断に盗まれてしまいました。もしかして、あなた様の写真がこちらに見つけて、おしえてください。大変申し訳ありません。
I'll be back soon with a step-by-step of some patterns~
These are seriously awesome, though.
the above images are all yubinuki,and all blatantly stolen from the Internet
What we've specifically got here are kaga yubinuki (加賀指ぬき). They are padded fabric rings decorated with silk thread. The origin of this style of thimble is credited to the Kaga region of old Japan, modern day Ishikawa prefecture, hence the term kaga yubinuki. When the term "yubinuki" is used in English, it is almost always in reference to this unique type of embroidered thimble.
I discovered yubinuki by way of a related craft called temari (てまり), a topic upon which I really, really hope to do a tutorial soon. The two are related in that they both apply colorful geometric patterns of silk thread to a padded, curved surface. Yubinuki, however, are easier in my humble opinion: there are fewer divisions to keep track of, only one stitch to remember, and they are generally much smaller.
The materials to make a yubinuki are fantastically simple. You need only a small piece of fabric, a needle, some thread in a few colors, some strips of paper, and a little padding. The Japanese use loose-fiber silk padding, but for those stitching in the west, I find that a bit of an unrolled cotton ball works just as well. (Polyfil does NOT work very well, as it is very springy and hard to wrap around the ring base without bits of it sticking out everywhere.)
もし日本語が読めれば、こちらには簡単な how-to があります。:D
If you can read Japanese, here is a simple tutorial all on one page. A more complete tutorial and the pattern to make the double yabane (arrow-tail) pattern can be found here. Even if you don't read Japanese, it's worth a look at just the pictures in each tutorial -- you'll quickly get the feel for what is being done.
Yubinuki instructions in English are a little harder to come by. Fortunately, there is Chloe Patricia and her blog, Ma Mercerie. Madam Patricia gives excellent tutorials for building a thimble base, stitching, making and using patterns, and more, all in English. パツリシア様、大変お世話になりました!
Once you're comfortable with building a ring base, all you need to do is learn the knot to start a new thread on the ring:
...and the single stitch used to make all the various patterns:
What allows for the variety of patterns is the number of divisions you mark on the ring (how many zig-zags of each thread), and in what order the different colors of threads reach across each other. After you get used to the basic stitch, you'll likely be able to mentally de-construct a finished yubinuki and understand the pattern used to make it. I'll be posting the basic ones as I finish graphing them out. :D
Until then:
Tutorials
Base-making tutorial: excellent pictures, Japanese text - also shows how to divide strips without measuring, using a line set or graph (from てんとう虫がやって来た)
Base and stitch tutorial: in Japanese (from Fujix Ltd. publishing)
Base and double yabane pattern tutorial: in Japanese, click each link in order from top to bottom to get a breakdown of materials, base making, divisions, stitch method, and pattern (from Thimble Japan)
Galleries
From 茶飲み話: works from 2006, 2007, 2008, and 2009 (all separate links)
From Zuccaさん: handmade yubinuki gallery
From Quilt-Yui: handmade yubinuki divided by design type (click the various links beneath the words 店主のギャラリー, the fourth menu item down in the left-hand frame)
From 人鳥官: yubinuki and quilting, link goes directly to yubinuki section
Blogs
Small pieces (category 加賀指ぬき)
Amerika tsukuri (full of yubinuki, temari, and miniatures of both)
...and there are a ton more. Try copy-pasting the Japanese term 加賀ゆびぬき (kaga yubinuki) into a GIS. Or, you know, just click here. :D
All actual pictures of kaga yubinuki in this post have been blatantly stolen from the Internet; I wanted to credit them, but I lost the links to the sites from which I saved them, 'cause I'm an idiot. -_-; すばらしい加賀指ぬきの写真は無断に盗まれてしまいました。もしかして、あなた様の写真がこちらに見つけて、おしえてください。大変申し訳ありません。
I'll be back soon with a step-by-step of some patterns~
Labels:
embroidery,
Japanese,
pattern,
tutorial,
yubinuki
Thursday, July 8, 2010
まだ生きているよ!
それは "I am still alive!" と言う意味です。And now I've missed the entire month of June, too. -_-;
I seriously, honestly intend to post tonight, and later in the week, about Japanese thimbles (yubinuki), which have kinda captured my heart for a few weeks.
Also, I am backdating this post to July 8th, which was Quex Day. ^x^
I seriously, honestly intend to post tonight, and later in the week, about Japanese thimbles (yubinuki), which have kinda captured my heart for a few weeks.
Aren't they pretty? (click image to visit creator's site)
Sunday, May 2, 2010
May Be
It's May. Damn. I missed the entire month of April. -_-;
News!
Good: Computer is fixed. The natives of Bleeping Computer.com are geniuses.
Bad: Crappy Anti-illegal Immigration bill + police getting shot up during drug busts + getting back into the 90s this week in the Land of Az. Also, it's very windy today and things are blowing away. :/
Good: Strawberries are $0.88 per pound in local grocery.
Bad: Unmitigated oil disaster off the south coast, the Koreas are duking it out under the radar, car-full-of-bomb in Times Square, WTF?
Good: Car-full-of-bomb was apparently built by a complete dumbass. Hah.
Bad: Tornadoes are kicking the midwest's collective ass, Tennessee is flooding, and the Blackhawks blew game 1 of their series against Van-farking-couver. (GRR.)
Good: I have stuff to post!
Bad: I don't have time to post it right now.
BACK SHORTLY. (♪Always look on the bright side of life~♪)
Labels:
trouble at Ku House
Subscribe to:
Posts (Atom)