Showing posts with label pattern. Show all posts

Tuesday, November 16, 2010

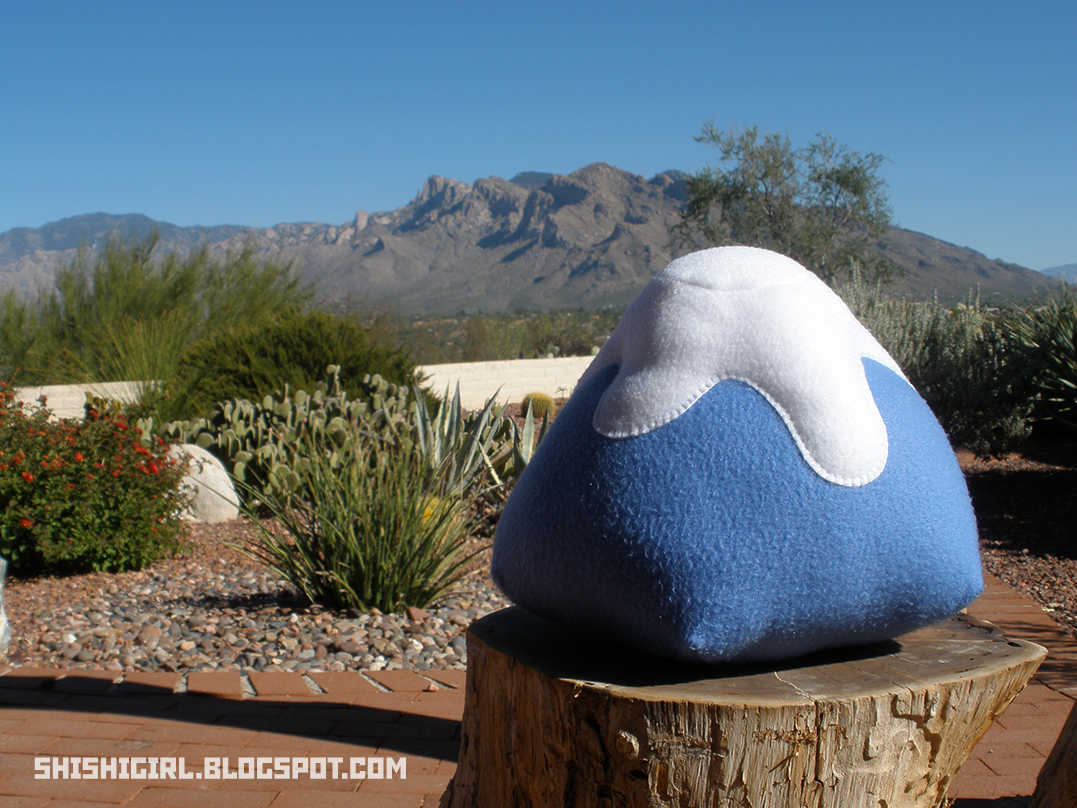
富士山:ふじさん, Mount Fuji

Woah, a softie pattern? Really?

Yep! :D

I've been sitting on this "mountain" idea for a long time, trying to figure out how to make it more mountainous. The original small version looked like crap:

Pfft, first try.

Then I tried to make a really big, fluffy one out of some fleece material, like a wumphy-fumphy pillow, but it also ended up looking like crap:

...especially when compared to real mountains.

...and then I discovered that somebody else had already made a much nicer soft Fuji:

damnit

...so fark that. Here's an Eyjafjoell, or Merapi, if you prefer.

Okay, not quite as bad.

 平和な場所と見えるけど、実は、富士山も活火山です。Despite it's peaceful visage in modern times, it is important to note that Fuji-san is also still an active volcano.

(She could blow any minute - save the tea!!!)

And, if you're interested, the word for volcano in Japanese is kazan, written with two very basic kanji: "fire" and "mountain".
火 = fire
山 = mountain
火山 = volcano
Pretty easy, right? This is actually the way most Japanese words are formed. Even single kanji, since they began as ideograms (shorthand pictures meant to illustrate the thing they were describing), can be built out of simpler kanji stuck together:
木 = tree
森 = forest
日 = sun
月 = moon
明 = bright
Hey, you just learned some kanji. :D 楽しみしてね!

Monday, July 12, 2010

ゆびぬき:yubinuki, Japanese thimbles

Once again, I have been side-tracked into another J-craft. I officially cannot resist pretty things. Not even a little bit.

These are seriously awesome, though.


The word yubinuki simply means "thimble" in Japanese. It can refer to the bucket thimbles we're accustomed to in the west, leather cuff thimbles, metal pad thimbles, or any one of several "thing that goes on your finger when you are sewing" accessories.

 
the above images are all yubinuki,and all blatantly stolen from the Internet

What we've specifically got here are kaga yubinuki (加賀指ぬき). They are padded fabric rings decorated with silk thread. The origin of this style of thimble is credited to the Kaga region of old Japan, modern day Ishikawa prefecture, hence the term kaga yubinuki. When the term "yubinuki" is used in English, it is almost always in reference to this unique type of embroidered thimble.


I discovered yubinuki by way of a related craft called temari (てまり), a topic upon which I really, really hope to do a tutorial soon. The two are related in that they both apply colorful geometric patterns of silk thread to a padded, curved surface. Yubinuki, however, are easier in my humble opinion: there are fewer divisions to keep track of, only one stitch to remember, and they are generally much smaller.

The materials to make a yubinuki are fantastically simple. You need only a small piece of fabric, a needle, some thread in a few colors, some strips of paper, and a little padding. The Japanese use loose-fiber silk padding, but for those stitching in the west, I find that a bit of an unrolled cotton ball works just as well. (Polyfil does NOT work very well, as it is very springy and hard to wrap around the ring base without bits of it sticking out everywhere.)

もし日本語が読めれば、こちらには簡単な how-to があります。:D
If you can read Japanese, here is a simple tutorial all on one page. A more complete tutorial and the pattern to make the double yabane (arrow-tail) pattern can be found here. Even if you don't read Japanese, it's worth a look at just the pictures in each tutorial -- you'll quickly get the feel for what is being done.

Yubinuki instructions in English are a little harder to come by. Fortunately, there is Chloe Patricia and her blog, Ma Mercerie. Madam Patricia gives excellent tutorials for building a thimble base, stitching, making and using patterns, and more, all in English. パツリシア様、大変お世話になりました!

Once you're comfortable with building a ring base, all you need to do is learn the knot to start a new thread on the ring:


...and the single stitch used to make all the various patterns:


What allows for the variety of patterns is the number of divisions you mark on the ring (how many zig-zags of each thread), and in what order the different colors of threads reach across each other. After you get used to the basic stitch, you'll likely be able to mentally de-construct a finished yubinuki and understand the pattern used to make it. I'll be posting the basic ones as I finish graphing them out. :D

Until then:

Tutorials
Base-making tutorial: excellent pictures, Japanese text - also shows how to divide strips without measuring, using a line set or graph (from てんとう虫がやって来た)
Base and stitch tutorial: in Japanese (from Fujix Ltd. publishing)
Base and double yabane pattern tutorial: in Japanese, click each link in order from top to bottom to get a breakdown of materials, base making, divisions, stitch method, and pattern (from Thimble Japan)

Galleries
From 茶飲み話: works from 2006, 2007, 2008, and 2009 (all separate links)
From Zuccaさん: handmade yubinuki gallery
From Quilt-Yui: handmade yubinuki divided by design type (click the various links beneath the words 店主のギャラリー, the fourth menu item down in the left-hand frame)
From 人鳥官: yubinuki and quilting, link goes directly to yubinuki section

Blogs
Small pieces (category 加賀指ぬき)
Amerika tsukuri (full of yubinuki, temari, and miniatures of both)

...and there are a ton more. Try copy-pasting the Japanese term 加賀ゆびぬき (kaga yubinuki) into a GIS. Or, you know, just click here. :D

All actual pictures of kaga yubinuki in this post have been blatantly stolen from the Internet; I wanted to credit them, but I lost the links to the sites from which I saved them, 'cause I'm an idiot. -_-; すばらしい加賀指ぬきの写真は無断に盗まれてしまいました。もしかして、あなた様の写真がこちらに見つけて、おしえてください。大変申し訳ありません。

I'll be back soon with a step-by-step of some patterns~

Saturday, March 6, 2010

もんきり:monkiri, family crest paper cutting

On the topic of kamon, here's something you can do with them. :D

click to download patterns in a PDF file

家紋:かもん、kamon, meaning "house" (家) + "crest" or "coat of arms" (紋)
切り:きり、kiri, meaning "cutting"; from the verb kiru, "to cut"
紋きり:monkiri, which translates roughly to "coat-of-arms cutting"

Monkiri (also called monkiri asobi) uses many folds and and brightly-colored paper to make paper cut-outs of popular family crests. The symmetrical and geometric nature of most kamon makes them perfect subjects for this craft. It's very similar to cutting out paper snowflakes. All you need to get started is some thin colored paper and sharp scissors.

click to visit the page I stole this graphic from: it's got a few patterns

It's popular to decorate blank uchiwa (団扇, paddle fans) and paper lanterns with monkiri.


They're nice on cards and wrapping, too. :3 楽しみして!

* Intending no offense to Canada... In fact, thank you, Canada! Your "eh" has helped me explain the sound of Japanese words ending in "e" in countless conversations. Also, I really like maple sugar candy and hockey. You guys are awesome.

Monday, February 15, 2010

Rawr. (a day late)

Okay, NOW it's 2010. Happy Chinese New Year of the Tiger. :D


Finally, a new pattern. I've been away from playing with felt for a while (largely because I still can't find where the movers packed it), but by the awesomeness of Nikki-the-Great, I had some special Japanese felt in reserve. (Just enough orange for a tiger -- Taihen doumo, Nikki!)

Also, process pictures. :3 Don't forget: right side of fabric means side that will be facing out when the whole thing is done; wrong side means the side that will be hidden facing the stuffing.

 
ONE: sew tummy and tail tips onto the right sides of fabric 


TWO: make the tail

This involves little more than putting the two tail panels right-sides-together and sewing around, remembering to leave the base of the tail open. Turn the tail right-side out, stuff it with fluff, and maybe add the applique stripes now, because it's harder to add them once the tail is attached to the body.


THREE: attach the tail

The "top" of the tail, that being the inside of the curve, should be facing the right side of the back panel. You can pin or baste it into place, whatever works for you.


FOUR: attach the bottom+sides piece

That long pointy piece provides both the bottom and the sides for this type of softie... it's built on the premise of a lunch bag "wedge" shape. Again, pin or baste it into place, making sure that it's relatively centered and even on both sides. (Ignore the seam in the middle of the piece I used here... I needed to improvise a longer piece from a tinier shape.)


FIVE: attach the front (face) piece

Just a reminder, all these pieces are facing wrong side out, right side in, with the tail hidden in the middle. Sew everything up, and remember to leave a hole of roughly 3cm unsewn somewhere, so you can invert your tiger and stuff it. (Ha, that sounds like a poorly-translated insult... "hey buddy, you can go invert your tiger and stuff it for all I care!")


SIX: invert and stuff

If you did everything right, you should now have this: white tummy on the front, tail attached at the bottom of the back. Now we get to stuff it up. If you want to make it more stable when it's sitting up (a good idea with this design, cause the bottom is so narrow), put something a little heavier in the bottom. I like to tape 10 pennies together and set them in as a weight, or make a little sack of rice out of some scrap fabric and put that in there. 


SEVEN: applique like crazy

I like this part... usually. Small pieces can be fussy sometimes. Using thread the same color as the piece you are attaching, applique the first layer of pieces onto the face and back of your form. I say the first layer because some of the pieces go on top of others. There is no special stitch to use: blanket stitch gives a nice edge if you have shiny thread or embroidery cotton, or you can just tack the pieces on with even stitches like I did. (Don't pull the thread too tight, else you'll get a wiggly scalloped edge on the applied pieces.)


EIGHT: back view

Once the stripes are on the back of your tiger, you're done there. (Note that the two stripes on either side go all the way around to the front.) As for the face...


NINE: 出来上がり - done!

Add the muzzle, eyebrows, and nose -- you now have a funny-looking Sack-o'-Tiger™ of your very own. おめでとう、congratulations! :D

So anyway, I hope to be around more often now. My sincere thanks to everyone who's been stopping by the blog, even while I wasn't posting anything new. You guys really cheer me up. m(-_-)m

Sunday, November 15, 2009

The End of Cake

タダイマカエリマシタ!!!>w< I'm back!

Grr, Google Ads, cut it out! This is not a cake blog! I know there have been some cake-related things in the past few months, but no! This is a blog about toys and sewing and paper and string and Japan!

See? A soft toy pattern! It's a plushie! ...of a cake. -_-;


This is the last cake-themed thing I'll post for a while. I promise. Really. 
Click to download the pattern as a PDF; instructions and pictures below.

I made this thing on the fly as a present for a former co-worker, the lovely Diana G., who knows everything there is to know about cake decorating and Wilton stuff. I wish I had some pictures of all the cakes she made and demo-decorated on Saturdays, 'cause damn, girl, were they ever awesome. And freaking sweet, too. Like the kind of sweet where you can feel the sugar crystallizing in your veins, but you still want more because it's just SOOOO good.

...eh-hem. ^^;

This is a pretty easy softie in theory; getting the edges of the frosting pieces to lay as you want and stitching them down with blanket stitch is a little bit of a challenge. Just go slow and it'll be fine. It helps if you make the whole cake form first, stuffing and all, and then sew the top frosting layer on to the finished form, so you're not fighting to get it pinned down on a limp, unstuffed model.

A Pictorial Walkthrough

1. Here are your pieces:


2. With a complementary color of perle cotton or embroidery floss, blanket stitch the frosting band to one of the layer side bands. (It helps to baste the pieces together first to keep them lined up while you stitch.)


blanket stitch, close up

3. This is what it should look like. Blanket stitch is a very easy and clean stitch that covers the raw edge of the felt and maintains that little bit of depth between the two pieces. If you have never done blanket stitch before, here's a lovely tutorial that shows it step-by-step. 


top layer, frosted bottom layer

4. Using regular thread, sew the other cake layer band to the top of the "frosted" one you just finished. 


"layer sammich", with finished seam along the top

NOTE: From here on, take care to remember which end is up, else things might get sewn to the wrong side of other things, which is a sucky mistake to make. :(

5. Sew your completed cake sides into a broad loop, wrong side (with all your seams) facing out.


...like this.

6. Sew on the bottom layer of the cake. It's really not hard to sew a circle onto the end of a tube; just line up the edge of the circle with the edge of the tube/cylinder of fabric, take a few stitches where the two are aligned, then turn the circle a bit and repeat. 


This is the top end, actually; notice the frosting on the bottom? I wasn't paying attention. -_-;

7. Sew on the top cake layer just as you did with the bottom, but remember to leave a gap of about 1.5 inches or so (3 cm+) to turn the form right side out. Stuff the finished form and sew the turning gap closed; it doesn't need to be pretty, because the top layer of frosting is going to hide it anyway.

Okay, so wait a second. Why did we just sew a top layer onto the cake if we're going to cover it up with the round frosting piece? Because it makes this last step much easier.


a blanket stitch in progress; going around the top frosting layer

8. Lay your frosting piece atop your finished, stuffed, stitched-closed cake form. Make sure it's centered. (Also, make sure it's on the right end.) Either pin on baste the piece into place so it doesn't get off-kilter while you're going around with the blanket stitch. Using the same embroidery cotton from before, blanket stitch all around the edge of the frosting top layer, laying each "ruffle" of frosting down over the edge of the cake as you go. Navigating the hills and valleys isn't really that hard if you just remember to keep your stitches evenly spaced and parallel to the closest tangent point of the edge.

For the strawberry on top, just make a tiny version of this softie. :D

Thanks for all the cake, Diana! (Especially for making the lemon ones, and letting me eat the extra frosting!) X3

楽しみして、ナハン〜!

Tuesday, October 20, 2009

Oh yeah, Halloween is coming.

I almost forgot. :D

Got some papercutting patterns for Halloween. If you like paper (I do) and are pretty cheap (I am), paper decorations are the way to go.


 the ghosts are red because, g*dd*amnitall, would you believe that I had absolutely no white tissue paper

...and here are the patterns:


Yay! :D 楽しみしてね!
PS: GRR where did the movers pack all my felt~?!

Wednesday, April 22, 2009

Happy Earth Day, にゃ〜

Happy Earth Day to you and your family. Most of all, happy Earth Day to the Earth. Please don't smite us, Earth. *invoke Barry White* We know we've been bad, we've treated you wrong... but we're sorry. It's gonna be different from now on, baby. Yeah. I promise.

And now, something completely different:

How to Make a Catnip Toy From Any Softie Pattern

...or, an alternative title...

For The Love of God, I Have To Find Something To Do With All This Catnip; Why Did I Ever Grow The Stuff In The First Place, And More Importantly How The Hell Did It Get Outside?


the enemy


This is nepeta cataria, or as it's commonly known, catnip. It's street name is nip, as in: "You got any nip, brother? Yeah, gimme a dime bag. The good stuff, man."

This fact established, my house (and a considerable portion of the back yard) have become to cats and catnip what Colombia is to the cocaine trade. (Sorry, Colombia.)

Nip grows quickly, roots deep, and will, hydra-like, replace any buds you remove with two new shoots. It will also (apparently) root itself from tiny clippings thrown carelessly into the yard and from there launch a blitzkrieg on your hapless lawn. In summary, if you do choose to grow catnip, you are going to need a lot of cats to keep it under control. Or at least one serious stoner cat.


what a stoner cat might look like

I do not have any cats, and this has been my downfall. My first plan to deal with the overgrowth was to visit cats in the local animal shelter with approximately a quarter-pound of catnip concealed in each pocket. This, while entertaining in the course of procedure, ended with the impromptu reupholstering of my coat with cat hairs, and shelter volunteers highly suspicious of the green flecks all over the floor, cages, and euphoric cats therein. I don't think the SPCA is going to let me in again, at least not without checking me for contraband.

Fortunately, I have several friends with cats. And I have their mailing addresses. And some boxes. And the patterns for many stuffed toys. :3

Without further ado, making a catnip toy.

Start by finding a pattern. Any softie pattern, available from this blog or otherwise, will work. In the pictures here, I am using the lovely bird pattern from Spool.


Now make your softie. However it's done, do it, but remember to exclude buttons, beads, or any small features that a cat could easily tear off and swallow. You might want to pick a tough fabric and make the seams extra-strong, too, just for the longevity of the toy... as cat-owners will attest, cats have sharp pointy things in a variety of places on their bodies and are adept at the destruction of toys and nearly everything else.

Go as far as to stuff your softie with polyfil, but don't sew it closed yet.


Okay, now sew a little pouch out of some scraps of fabric. Almost any fabric will work, so long as it's breathable (don't use vinyl or leather or anything like that). Canvas works well. When your pocket is three-sides sewn, fill it up with as much dried catnip as you can cram into it, then sew it shut. If you can squish the pouch and still smell the catnip through the fabric, it's perfect.

You could just pour some catnip into the unfinished soft toy along with all the stuffing, but this tends to result in the eventual escape of catnip flakes from the seams, all over the cat-owner's carpets, furniture, etc. By confining the nip in it's own little pouch, you can usually avoid this.

Last step. Through the opening left for stuffing your softie, put your pouch of catnip inside. It doesn't have to go in the middle of the stuffing - we're not trying to smuggle it across the border. Just poke it in there between the fabric and the stuffing, where it's likely a cat will be able to smell it.

Now just stitch up the stuffing gap, find a cat, and let 'er rip. :3


楽しみして〜

Saturday, April 4, 2009

Caterpillar = あおむし, a-o-mu-shi

Back to softie patterns! If there is anything more due for plushification (or softifaction, or stuffitization), it is the caterpillar. Or "callipitter" if you are, like me, prone to talking funny.

I am a caterpillar nut. I love them. Not just the cute kind or the fuzzy kind or the very hungry kind, but ALL of them. They are awesome. I can conceive of no living figure more wiggly, squishy, and just the right kind of amorphous to be cuddled and wuffled in softie format. Ergo:


I wish good luck to anyone who decides to make a caterpillar. This is still an "easy" softie design as soft toys go, but it takes a little forethought and patience to get around the curves.


Better shot from the side. His butt looks exactly like his head, minus feelers and eyes
- patterns on the back are entirely arbitrary.

Two things to watch out for are:

1) The feelers. These are not stuffed, just two layers of felt sewn against eachother for stiffness, then reversed to hide the stitching. Remember to position them with the clubbed ends aiming IN to the right side of the fabric when you have the whole figure wrong-side out for sewing, else they'll be lost when you go to turn the figure.

2) The darting* on the belly piece. This isn't really hard at all. You're just negating that section of fabric from the total surface of the figure by pinching it to the inside and sewing it up.

In this case, the darts make sharper creases under the caterpillar's legs so that they'll aim downward, rather than just stick out to the sides. Darts are most useful in the "armpit" areas of many softie figures, since they can help direct the angle of the limb or take up unwanted fabric that would otherwise just fold into a wrinkle.

As always, remember to leave a space along one seam so you can turn the figure inside out before you stuff it. It's a little harder to decide where to leave your turning space in this caterpillar pattern because so many of the seams are curvy. I suggest placing the gap along the straight seam that runs right down the back of the caterpillar. You can always cover it up with some applique pattern pieces later. :3

And now, here is a little chant about caterpillars:
Caterpillar, caterpillar, fat and funny
Pick it up and rub it's tummy,
Feed it leaves and watch it play,
And put it back at the end of the day.
...and the simplified (for the sake of rhyme and rhythm) Japanese version:
あおむし、あおむし
ながくて、かわいい
ひろげて、あそべて、
かえして、グドバイ

aomushi, aomushi,
nagakute, kawaii,
hirogete, asobete,
kaeshite, gudobai
...the further extranslation of which is:
Caterpillar, caterpillar
Long and cute
Pick it up, play with it,
Put it back, goodbye!
...eh-hem. -_-;

In any case, please have fun. 楽しみしてね~


*I always thought this was called "tacking", but apparently tacking is something entirely different to people who actually sew for a living, so I'll take their word on it.

Friday, March 20, 2009

Minimimminimmiminimo.

*deep breath*

Minimimmo. Yes, that's it. Finally.


Just a short link to the lovable and slightly creepy Minimimmo, a tiny yellow print-and-fold dood. The original Minimimmo has been out for a while now, but its creator (box73, Italian and good at it) keeps coming up with new, limited edition iterations of the design. Like Batman.


In the finest papercrafting style, this is one of those clever models that requires no glue or tape, but it might take a little patience (especially if you're printing out on regular computer paper).

Ev'viva il Conquista~

Tuesday, March 3, 2009

おひな様〜

おひな祭 (Ohina Matsuri) is today~ ^w^

I won't spend your time on a lengthy explanation, suffice it to say that it is the famed Japanese doll festival held in honor of girls and young ladies, with the wish that they will grow up healthy and beautiful and find a happy marriage. Rainbows and unicorns.

...and if stereotypical domestic bliss isn't your thing, the dolls are still a ton of fun.

切り絵 (pronounced key-ree-EH) is somewhat different from paper cutting or kirigami. For the paper-loving crowd, here's a quick breakdown of the terms:
papercutting or paper cutting: general English term for any art produced by cutting one or more sheets of paper; generally assumes a minimum of drawn media

切り紙, kirigami
: Japanese term that translates as "cut paper"; a not-necessarily broad term for cut paper arts, usually referring to geometric shapes cut from folded paper (think "paper snowflakes" and you've pretty much got it).

紋きり, monkiri: a branch of kirigami that deals specifically with the folding and cutting of paper to produce familiar mon (or kamon) family crests and motifs

切り絵, kiri-e or kirie: as presented in this post, means "cut image"; a term for images cut from a single, unfolded sheet of paper, usually black, which can manifest either as linework or as a positive-negative reduction image

wycinanki: Polish papercuts, with the Lowicz-style being unique in the world of papercutting for the use of multiple layers of bright colors

Of course, kiri-e isn't the most common medium for hina dolls. Most traditional ones are hard dolls, clothed in silk and embellishments, with ceramic faces and hands:


...or semi-soft ones made with just silk:


...or unique ones made from the empty, dyed cocoons of silk worms:


...but my favorite kind are always paper:


Hina dolls are probably one of the most fascinating elements of Japanese craft culture for folks who enjoy softies and figure work. For more images and inspiration, may I recommend searching the terms おひな様 or ひな人形 on Google image search. There are some amazing sets out there.